This post will outline and explain in great detail how to install Windows Vista, reinstall, upgrade, perform recovery, repair, restore and format.

INTRODUCTION:
If you were searching for how to install Windows Vista, then you have come to the right place. I have read countless posts and forums, but none of them detail the steps involved in the installation and the problems that people face.
So I decided to
make my own post on what the steps are and the problems most of us face
during the installation process for Windows Vista. I hope the detailed steps will be use
full to everyone. This process will teach you not only how to install windows but will
provide you with basic computer knowledge so that you won’t ever have to take
your system to the computer shop.
Criticism and opinions are much appreciated.


Click on "NEW" to create a new partition. In the box provided enter the amount you want to allocate to the partition.
For the C: Drive I always allocate 50.15GB. This is because after windows installation and all basic updates and softwares installed Windows Vista takes up almost 20.5GB of space. So always leave room for windows to grow.
The calculation : 1GB = 1024MB
For 50.15GB = 50.15 x 1024 = 51354GB (Round Figure)
Enter this amount or whatever amount you decide and hit APPLY.


Criticism and opinions are much appreciated.
WINDOWS VISTA INSTALLATION:
NOTE: I always recommend a clean installation, regardless of which windows version you intent to install. A clean installation will provide better stability and increased performance can be expected when installed to a clean hard drive or partition.- BACK UP FILES & DRIVERS:
Always remember to back up your files and computer drivers before performing any kind of installation. To back up your drivers you can use the following 2 ways.
1.1) Batch File(WINDOWS XP): I have provided a batch file that will backup your drivers and save them to your documents folder for Windows XP. But this batch file will not work for VISTA or WINDOWS 7.
1.2) Free DriverMax(WINDOWS VISTA or 7): For XP, Vista or Windows 7 consider Innovative Solution's free DriverMax. It is FREE but you still must register it if you wish to keep using it. Once installed and registered, it automatically backs up and restores drivers.
I recommend creating both driver backups if you are using Windows XP as my batch file is not 100% reliable. - INSTALLATION PROCESS:
- Insert your Windows Vista DVD in your DVD Drive.

- Restart your computer.
- Now you need to access the Bios Setup. To access your bios setup, during the boot up press the Key Commands needed to access the BIOS, this will be a text message usually at the bottom or top of the screen. If your system has a splash screen with the OEM logo hiding the boot up screen, press ESC as soon as you start boot up.

- When you get to the BIOS, access the screen that allows you to change the boot sequence. Set it to boot from CD before hard drive in the boot sequence.

- Now your system will restart again and will show you the following screen. Follow the on screen instructions.

- Now the system will show that Windows Vista is loading setup files.

- Now you will see the Vista Boot up screen

- Now you will see the welcome screen of Windows Vista Setup. Select the language that you want to install and also the keyboard layout. By default language is English and the keyboard Layout is US. Click "Next " to continue.

- Now the setup will show you the option to install windows. click the button to continue.

- Now the setup will ask to enter the License Key for your Windows. Enter the key and hit next.

- You will have to accept the license agreement in order to continue with the setup.

- Now the setup will ask which type of windows you want to install, Upgrade or Custom. For a clean installation we will choose the Custom option.

- Now you will see the partition manager. Here you can choose how many partitions to create and/or the amount of space you want to allocate to each drive/partition.

- Click on the Drive options to show more options.

Click on "NEW" to create a new partition. In the box provided enter the amount you want to allocate to the partition.
For the C: Drive I always allocate 50.15GB. This is because after windows installation and all basic updates and softwares installed Windows Vista takes up almost 20.5GB of space. So always leave room for windows to grow.
The calculation : 1GB = 1024MB
For 50.15GB = 50.15 x 1024 = 51354GB (Round Figure)
Enter this amount or whatever amount you decide and hit APPLY.
- Hit FORMAT when you have created the partition. (NOTE: A system reserved drive will be automatically created of 100MB. Do not format this partition.)

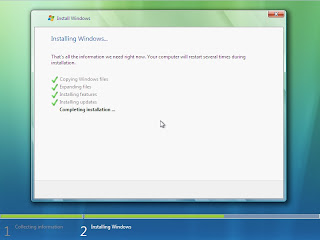
- Now you can leave the system for about 30-35 minutes while Windows Vista installs onto the hard disk. The Setup is completely automatic and the computer may restart a couple of times during this process. If the computer restarts, just leave it alone and don't press any key to boot from CD/DVD.


- After the setup is complete, you will be asked to enter some basic setting like your Name, Password, Computer Name, Windows Update Settings, Time, Date and Timezone Settings and Computer Location.


- Once you hit NEXT the Windows Vista Setup starts to analyze the computer and tweaks the performance and visual settings for optimal performance.
- Once the analyses is finished a welcome screen will appear and Windows will prepare your desktop for you. You will be taken straight to the desktop.


That concludes the Installation process of Windows Vista on your computer. If you have any suggestions on any of the steps, leave your comments and/or suggestions. If you want me to explain any of the steps just leave a comment.
How to Install | Reinstall Windows XP
How to Install | Reinstall Windows XP
Thank you.
No comments:
Post a Comment